The Sheltered Descent is the first level I fully designed and built in Unreal Engine 5. I created it alongside an accompanying quest, Good Deeds, for the upcoming soulslike action-adventure RPG Samsara. I completed this level as part of a Skills Bootcamp with INFINITY27, a UK-based game studio and Unreal Authorised training provider.
Brief
I worked on this project as a quest and level designer over part-time hours for around eight weeks. My task was to design a quest, dialogue and a new level for Samsara. My primary goal was to design and build that level as a blockout in Unreal Engine 5, which was completely new to me. I completed both the quest and level design tasks successfully and presented the final results of my work as a pitch to the development team after playtesting and iteration. I was later hired on a short-term contract by the studio to complete this level to external demo quality for their game. This included quest and dialogue implementation in-engine.
View Level
Creative Process
The workflow I followed to complete these tasks was fairly agile and iterative, after familiarising myself with the game.
- Introductory Phase and Briefing
- After the introductory presentation, I took some time to research and strengthen my grasp of the game’s story and gameplay loops. I asked lots of questions during this stage, gathering additional input from the Art department to strengthen my understanding of the team’s vision for Samsara and what I needed to communicate to the player.
- I was introduced to the studio’s Levels of Fidelity and Definitions of Done. These clear benchmarks enabled me to plan more clearly, knowing the required expectations for the finished quest, dialogue and level design.
- Quest Design and Dialogue Phase
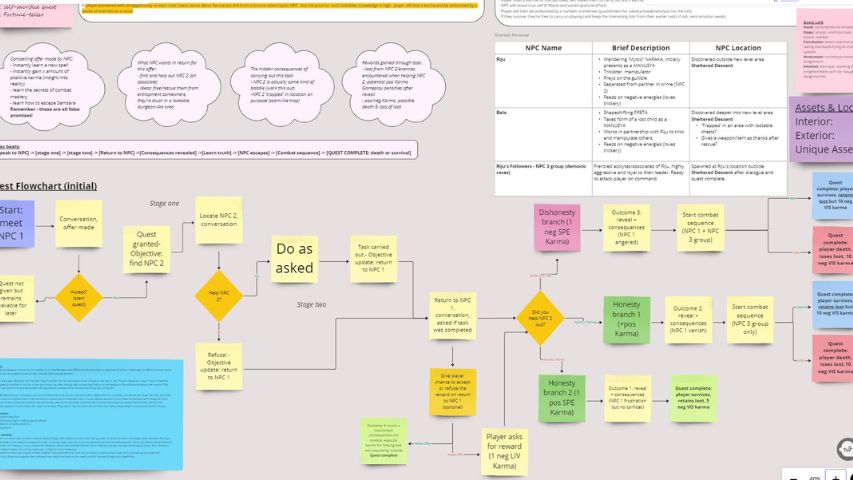
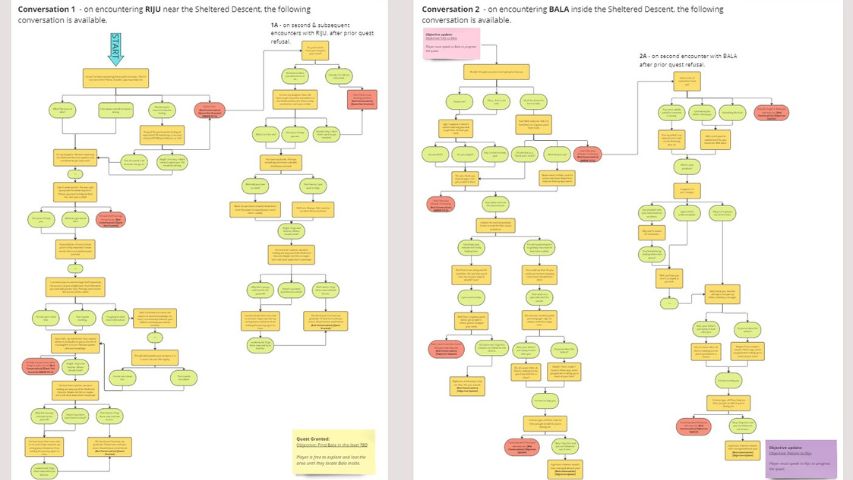
- After learning about Samsara and its core gameplay pillars, I devised a quest concept and mapped out a narrative structure.
- I mapped my branching structure first, to allow for varied outcomes and consequences, taking into account the game’s unique system of karmic rewards.
- Once my structure had interesting options that aligned with the game’s themes, I developed two NPCs and their accompanying quest dialogue. This part of the process took place fairly rapidly as a flowchart within the team’s Miro board.
- Lo-Fi Level Design Phase
- Next, I sketched out a rudimentary 2D bubble map for my intended level. This included laying out the critical path and identifying where enemy encounters could take place.
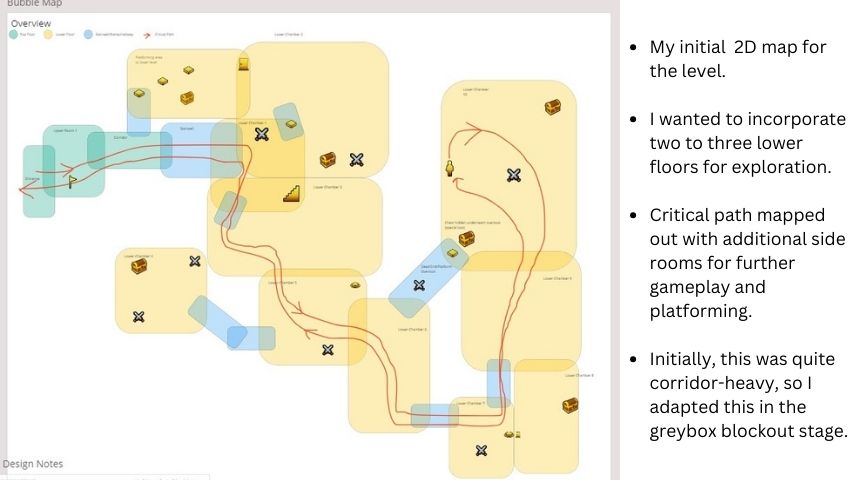
- My early lo-fi designs were a bit ‘boxy’ and had several connecting corridors, many of which I later dispensed with and designed with better verticality in mind.
- I put this down to my only prior level design experience being with the Skyrim Special Edition Creation Kit, which uses corridor kit pieces for most room transitions.
- Location and Whitebox Phase
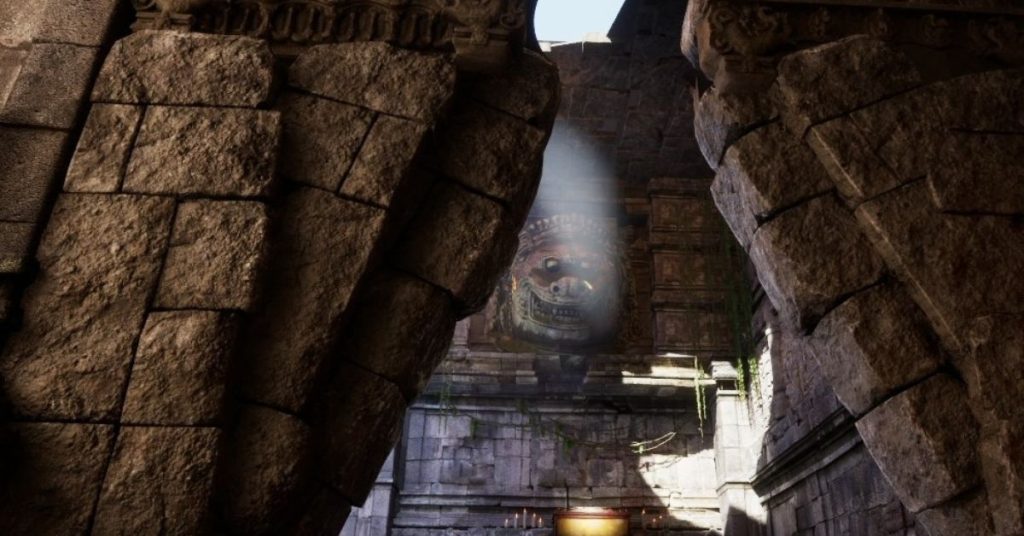
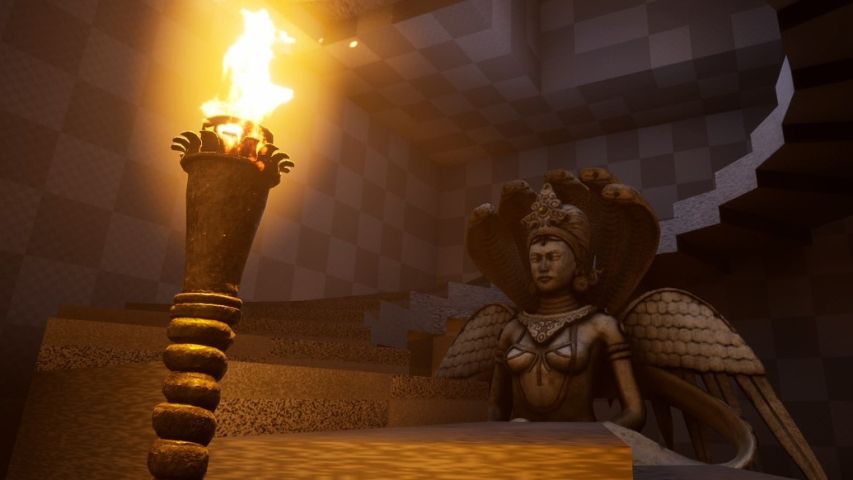
- Next, I identified a location in Samsara’s Jambudvipa continent for where I could feasibly fit my level. I planned to build a temple ruin that transitioned into a cave space beneath. I chose a cliffside spot with plenty of descending vertical space.
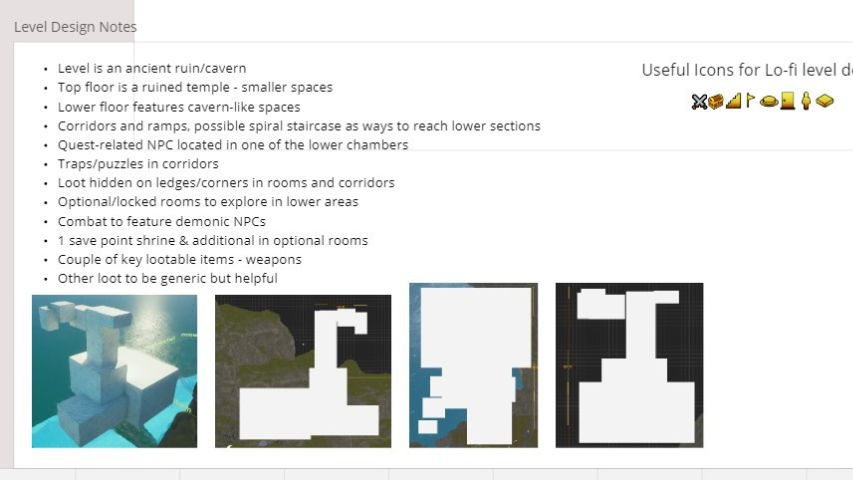
- I then built a whitebox of my level according to my 2D map. After seeing this in Unreal, I realised that I wanted to change the shape of my level quite a bit.
- In particular, I wanted to eliminate most of the corridor sections I’d planned and make the level far less horizontal. I decided to do this in the blockout stage.
- Greybox Design in Unreal Engine 5 Phase
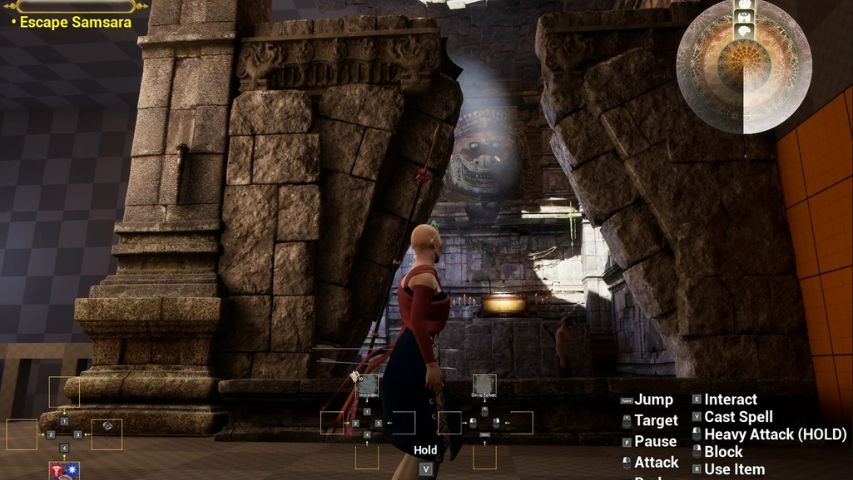
- Next, I began working on a building a greybox blockout in Unreal. I used the engine’s cube grid modelling tools to construct the outer shell and initial internal shapes for my level.
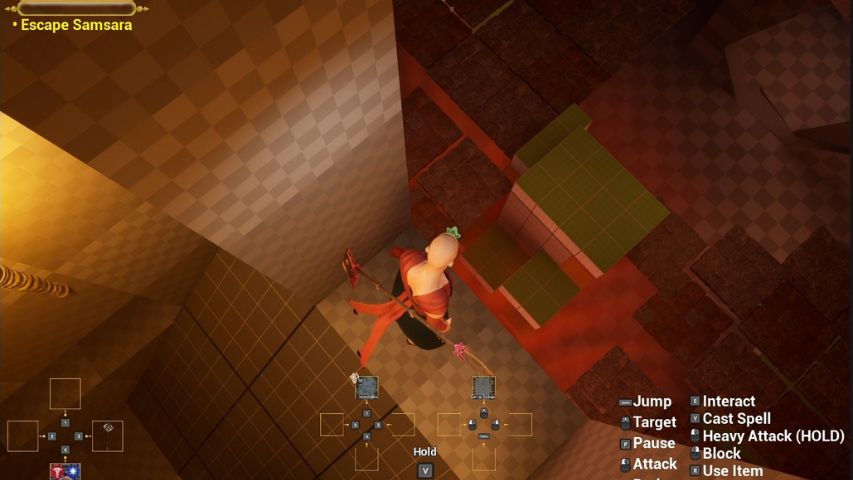
- I wanted the player to experience a feeling of unease and uncertainty the further through the level they progressed, so I decided to implement lots of sharp angles and triangular shape language throughout.
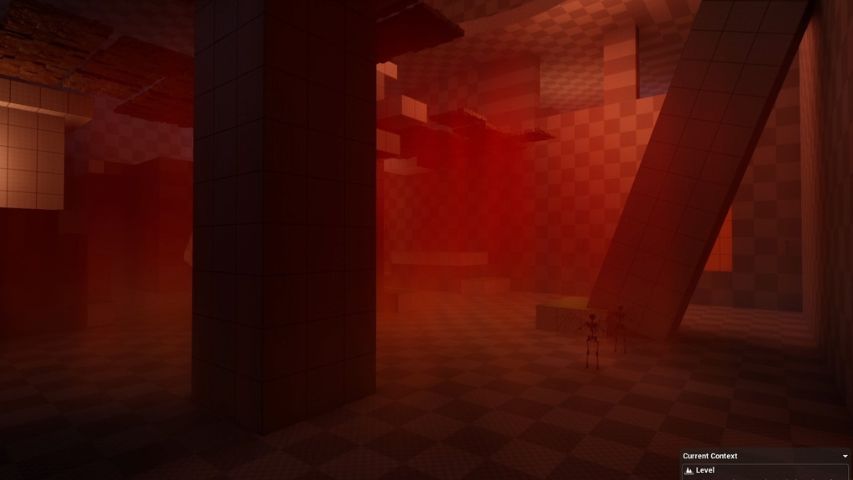
- One exception to this is the spiral staircase at the end of the first temple section. This was partly because I wanted to learn how to make one, but also because I wanted to communicate a theme of deceit. The staircase starts off feeling quite safe but as the player descends, a more ominous feeling takes over as the level becomes darker.
- As I became more confident using the engine’s modelling tools, I began to look for ways to reuse the spaces I’d built by constructing additional floors to the rooms and adding platforming opportunities into the walls and upper areas.
- I wanted to ensure players had ample opportunity for optional exploration so that my level didn’t feel too linear. This meant including hidden corners, nooks and platforms as well as reusing room spaces.
- I used the game’s built-in Actor Palettes to do this, which allowed me to be more creative with the spaces I’d designed.
- Enemies, Loot and Blueprinting
- Once I’d completed the greybox and tested it for traversal issues, I began to populate the spaces with enemy encounters and loot.
- To align with the themes of my quest, I wanted to make the encounters more challenging the further into the level players descended.
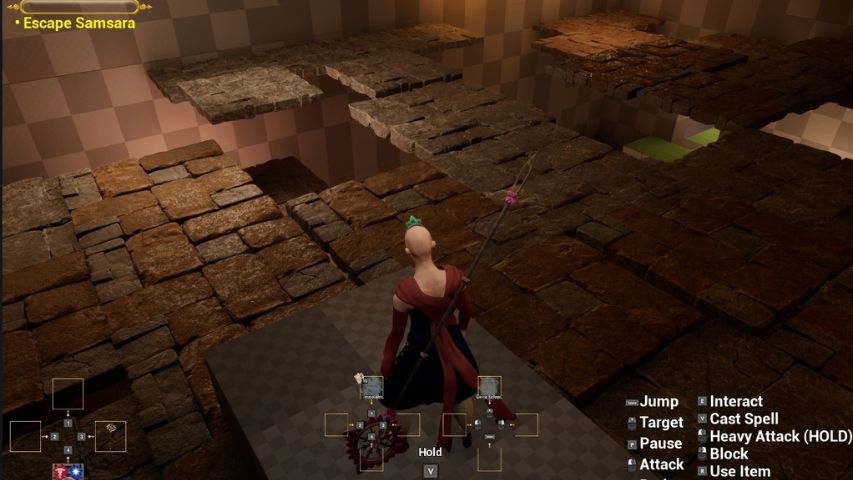
- At this point, I decided to implement a new trap-like feature into my design in the form of detonator floor tiles. The game already had a crumbling floor tile which would break as soon as the player stepped onto it, but I wanted to modify this slightly to create a new effect. By stepping on one ‘detonator’ tile, several surrounding tiles would be activated instantly and crumble around the player, leaving much larger gaps to navigate.
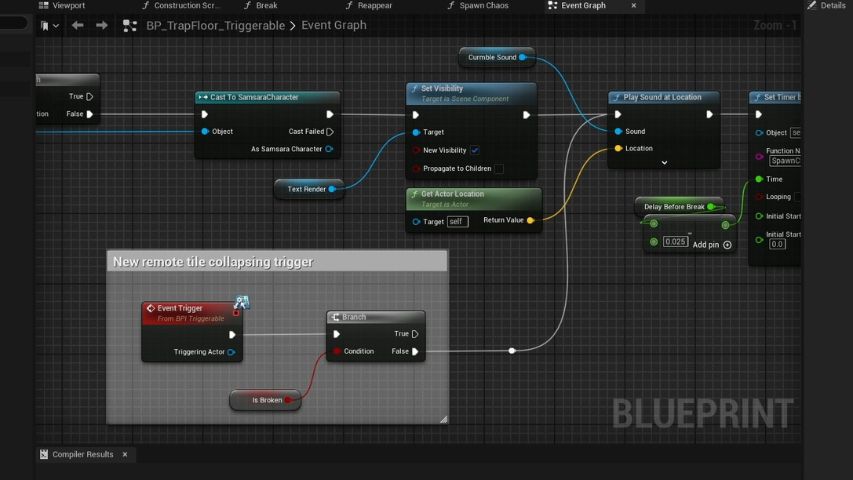
- Modifying the Blueprint
- To do this, I created a new tile using the existing tile’s Blueprint and made changes to its behaviour so that it would crumble without being stepped on directly. Then, by adding a switch onto one of these tiles and linking it to the others, a remote triggering effect was created. I also made some colour changes to these tiles to try and signal to the player that they had a different purpose.
- These tiles worked really well in the lower sections of the level, particularly when designing a layered tile space for players to try and traverse safely.
- Minor Art Pass – “Beautiful Corners” Phase
- I then used the game’s existing art assets to set dress a small section of my level, to create a “beautiful corner” effect. This was to help inform the artists of the intended visual style and themes of the level.
- I also added in a range of lighting, colour and fog effects to give the level a dark and dangerous feel, particularly in the cavern depths.
- Playtesting and Iteration
- My level then went through two rounds of blind playtesting from the studio’s developers, alongside a number of additional ongoing playtests from my mentor. After gathering their thoughts and feedback I made some minor iterations to things like platform jump heights and enemy patrol routes and hearing radiuses.
- Presentation and Pitch
- After some final playtests, I was ready to present my completed level to the developers.
- I did this remotely over Google Meet with video clips, slides and an in-engine flythrough, discussing the associated quest and potential for NPC and level re-use in additional game levels.
Design Decisions And Reflections
Things That Went Well:
- I successfully designed and wrote the branching quest design and dialogue and developed two engaging new characters with scope for further use.
- I also picked up the technical skills needed to create my design in Unreal at a good pace and managed the scope of my design well, making adaptations where necessary.
- I used the spaces I built to communicate the themes of my design in creative ways. This included designing puzzle sections that generated new ideas I’d have liked to implement if I had more time. These include additional modifications to the trap floor tiles that could create exciting possibilities for player interactivity.
Things That Didn’t Go So Well:
- Time-wise, I’d liked to have started the greybox part of my design a bit earlier. However, in the early stages of the project I was still learning how to use Unreal, so in future, I think I’d be able to start the blockout part of the design much faster.
- Understanding the core story and message of the game also took me a little longer than I’d expected, due to the scope and depth of the Buddhism-based theme. I think this was due to not having much time to play the game in the early stages of the project.
Retrospective
- Having a stronger grasp of the game’s core story sooner would’ve enabled me to ideate quest concepts faster and more confidently in the first week or two.
- The skills I learned during the planning and greybox stages of this project will help me to be more effective when drawing lo-fi versions of levels I plan to design in future.
- My quest and dialogue work is an area of strength but I shouldn’t lean on that too much when aiming to present my level design work to others.
- I need to develop my understanding of Blueprints further to help expand my technical skills in Unreal.
What this project taught me
Primarily, this project taught me the technical skills I needed to be able to build 3D levels in Unreal Engine 5. I’ve been trying to learn this for a while, but the structure of this project and my mentor’s support helped me pick up those skills much more quickly and efficiently. I also feel that I’ve gained a better understanding of creating playable spaces that give players lots of options for exploration and problem-solving.
The ability to work rapidly and prototype on paper also came in handy with this project, although I think I could create better lo-fi level designs in future projects. In future, I’d ensure better visual communication of verticality on paper and attempt to design with more off-grid, less ‘boxy’ maps.
I’d like to focus more on Blueprints, as this project was a great introduction to Unreal’s visual scripting. Despite my inexperience with Unreal Blueprints, I overcame this during the project so that I could create the exploding tiles. However, I’d like to work on it a bit more for my own understanding. Doing so will allow me to design with greater speed and confidence.
This project also taught me to consider ways of designing from a player-first perspective. I learned a lot about level design theory, particularly about implementing landmarks and visual clues that communicate to the player what they need to do in a certain area. I’ll continue this in my future design work.
This project also gave me crucial experience of working on a live game in a remote-first studio environment. It was a great way to collaborate online, by attending regular stand-up meetings over Discord and working on the studio’s in-house computers via Parsec. I also learned how to use Source Control, particularly Perforce, and kept the team updated regularly using Hansoft tracking, as well as during daily working hours on Discord and Google Meet.