Lokir’s Tomb is the first level design project I created. It’s a small dungeon I made in the Creation Kit that can be added to Skyrim Special Edition and explored as a game mod. The project taught me a lot of basic concepts in level design and strengthened my interest in environmental storytelling.
Brief
I decided to broaden my skillset into level design earlier this year. After primarily focusing on game writing and narrative work, I wanted to develop my abilities as a game designer overall. I felt that level design would be the best place for me to start with this, so I turned to the IP and learning environment I’m most comfortable with. Beyond Skyrim’s Arcane University is where I first really began to develop my writing chops, so it felt like the ideal place to start learning level design fundamentals. The first stage of their level design course is to complete Lokir’s Tomb, Bethesda’s initial tutorial content for the Skyrim Special Edition Creation Kit. I was encouraged to follow the tutorial process but put my own creative stamp on the environment as I got used to working with the Creation Kit.
Explore Lokir’s TOmb
Creative Process
For this self-directed level design project, I implemented the following workflow.
- Research and Creation Kit Basics
- First, I explored the tutorial material and familiarised myself with the Creation Kit. I’d never used the software, so spent time learning about its tools and gizmos during setup.
- I also used this time to play through and look more critically at existing Skyrim dungeons. This helped me get an idea of potential layouts and look more closely at how assets fit together.
- After getting used to the level editor and its functions a bit further, I moved on to the first stage of creating the tomb.
- Layout Using Kit Pieces
- Following the tutorial references, I set about building the shells of the dungeon spaces using the engine’s room kits. Snapping these pieces together was fairly straightforward, although combined floor and ceiling pieces caused a few early issues. This was due to incorrect rotation, which I quickly fixed.
- However, the main problem was the limited visibility; with the ceiling put in place at such an early stage, it didn’t leave much room to see what I was doing when cluttering and navmeshing later on.
- In future builds, I’d probably opt for pieces that allowed ceilings to be left open until everything inside the interior spaces had been constructed and placed.
- The kit pieces were very useful for teaching me the basics of snapping and positioning to quickly build dungeon interiors. It felt quite jigsaw-like at times though.
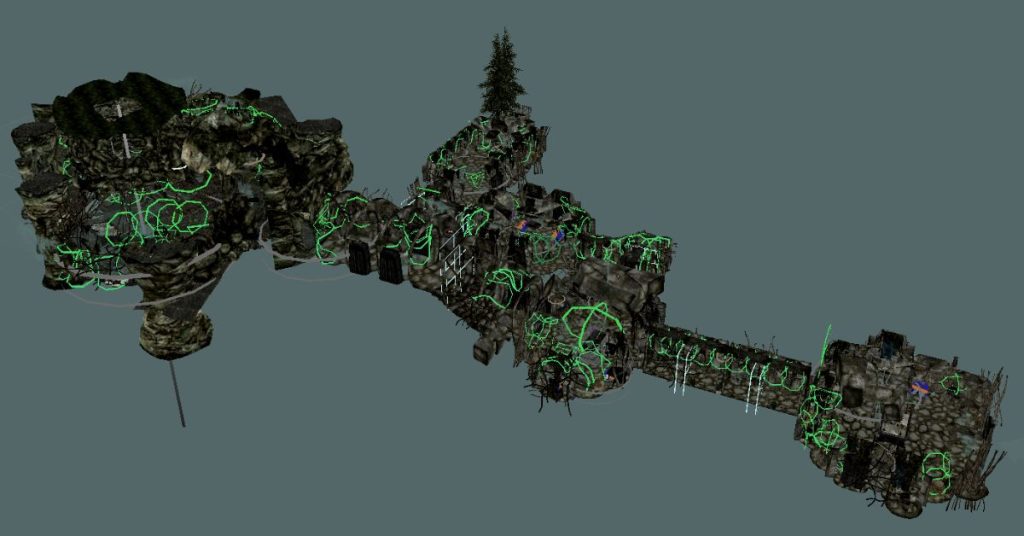
- I used the dungeon kits to construct three small rooms, corridors and staircases, with an additional space left for a cave at the end. I wanted this to feel more organic, so building it off the grid and combining kit and non-kit assets made more sense. I later learned that this is called kitbashing and is actually an acceptable thing to do in level design.
- Going Off-Grid and Customisation
- Next, I created the cave space at the end of the dungeon using a mixture of cave kit pieces and individually placed boulders, cliffs, pillars and floors. This took much longer than the previous rooms, due to the specific placement and rotation of boulders and rocks to ensure a smooth and authentic-looking transition between the dungeon corridor and the cave entrance.
- Although more time-consuming, I found that working off-grid created more realistic results in terms of ‘cave feel’. So, I returned to the kit-based dungeon rooms afterwards to see where I could make similar changes.
- I removed some ceiling pieces and added holes in the dungeon roof to allow glimmers of light inside. I covered the sharp edges of the kit pieces with rocks and pillars to give the ceilings a collapsed look and feel. This way, I could add some dynamic day-to-night lighting and fog effects later in the process.
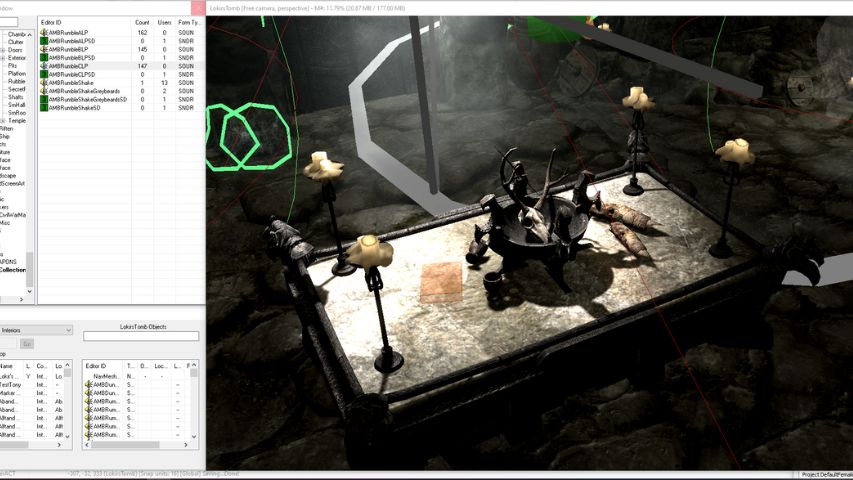
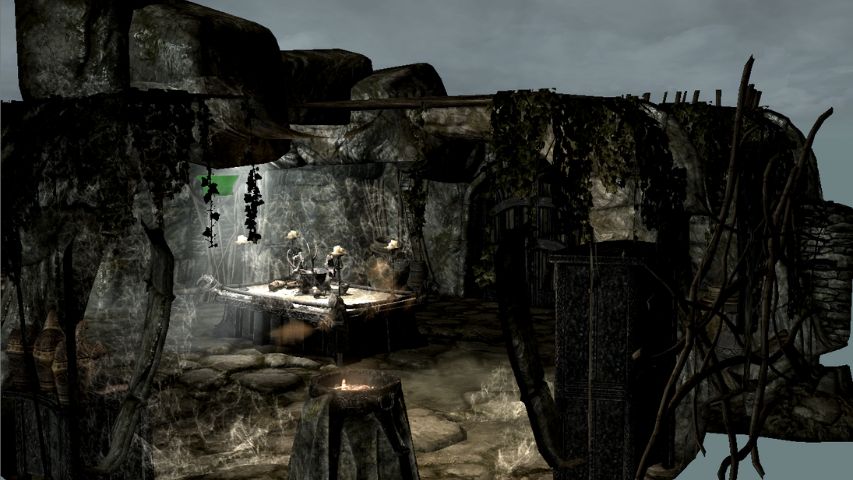
The first room of the tomb acts as an entrance vestibule, with an offertory altar and various additional Nordic clutter. Dummy items include a levelled book, dagger and a couple of potions.
- Cluttering
- After building the spaces for the player to flow through, I began cluttering the environment. I approached this one room at a time, but I found it helpful to devise a narrative plan for each space as I added furniture and objects.
- It made more sense to me to give each room purpose so that the level told a story. This helped me envisage what each room needed to look like to communicate the events that took place in each one.
- With this in mind, I designed a worshipping chamber, a reflective central space, a ritual chamber and a burial site. I also considered the type of creatures and enemies that would inhabit the spaces and began cluttering accordingly.
- After placing larger objects such as collapsed rubble, altars, fire pits and sarcophagi, I added several levelled items such as weapons, potions and skill books. Additional clutter such as decorative items, torches, a crafting table, treasure chests, vines and cobwebs were also added to develop the aesthetic.
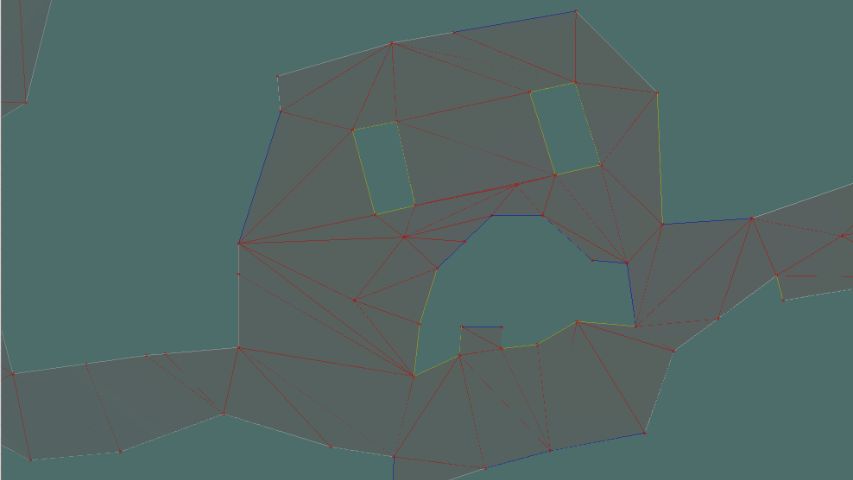
- Navmesh
- After a first pass and some adjustments to the level’s clutter, I began the navmesh process. The Creation Kit has an auto-generation navmesh tool but the Arcane University teachers strongly advised against using it. Instead, navmeshing is done by hand, to ensure better accuracy overall.
- This part of the process probably took me the longest to get right. Hand-placed navmeshing was entirely new to me and it took more than a few attempts to lay down well-optimised pathways and rooms one triangle at a time.
- Although tedious and at times frustrating, it was a worthwhile process as it gave me a much stronger understanding of and technical skill at customised navmeshing for the spaces I’d designed.
Ironically, one of my rooms made its feelings quite clear about my early attempts at navmeshing.
- Enemies, Encounters and Traps
- Next, I considered enemy placement and additional encounters. Although I took inspiration from the tutorial materials here, I also wanted to include elements that fed into the narrative of my level overall.
- To that end, I incorporated additional monster encounters, using spiders and skeletons alongside a necromancer, two mages and a final boss Draugr fight. I gave some of them patrol routes and idle behaviours, then set up an ambush trigger box for the final boss encounter. Seeing it all come together and actually work for the first time was brilliant!
- I then placed some traps in the central area of the dungeon, although certain damage-dealing traps such as a swinging ceiling mace, for example, didn’t feel particularly in keeping with the theme of the level. To learn how to implement traps though, it was absolutely worth doing.
- Optimisation and Roombounds
- After placing and testing my enemy encounters, I worked through the optimization stages, adjusting any line of sight issues and creating roombounds and portals.
- I then tested this thoroughly in-game to ensure that all rooms and portals were linked correctly and that there weren’t any major performance issues.
- This took a little while as some of the room markers needed to be adjusted manually to incorporate all elements without overlap, but I got it all set up correctly eventually.
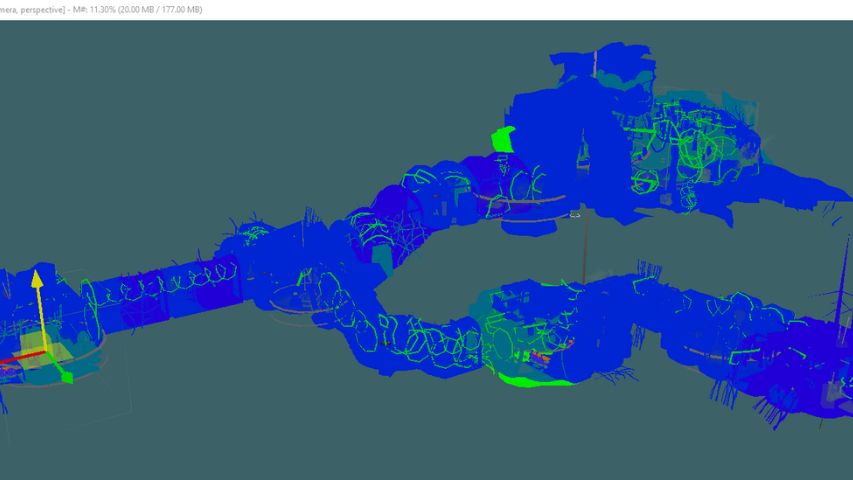
Checking the dungeon for any potential performance issues from light placement was something I did frequently, especially when placing shadow-casting lights.
- Lighting and FX
- Next, I worked on lighting the level. I really enjoyed creating dynamic light effects and experimenting with shadow casting and directional lighting. I also made sure to run a lighting debug check often whilst doing this, to ensure there’d be no knock-on issues in performance from my lighting choices.
- I also added fog, glow and dust effects to the dungeon, experimenting with different internal and external emittances to give a day-to-night visual on dust particles and light beams. This really helped bring the space to life and gave me a better insight into the art of game lighting in general.
- I then tested and implemented different lighting templates and imagespaces in the Creation Kit to give my dungeon a more atmospheric overall feel.
- Other FX added at this stage included audio and sound effect markers, mist and smoke, cobweb rupture effects and dust drop markers.
- I took a lot of time over this part of the process, to ensure the mood and tone felt right.
I used the holes I’d made in the ‘collapsed’ ceilings to place beams of light and added external emittences to create a day-to-night effect, alongside wind and rumble sound effects.
- World Placement
- Finally, I worked with the tutorial references to link the level to a real-world location in Skyrim. This included building the outer entrance to the dungeon in an exterior cell near the game’s Riverwood settlement.
- I then added location markers, populating the dungeon cell with the correct zone and location data, and added and oriented a north marker for the player compass.
- After cleaning the plugin, correcting some accidental vanilla edits in SSEEdit and checking for any issues, I sent it for approval to my level design tutor, who was very happy with the work I’d done.
- Feedback and Playtesting
- I submitted my level for regular feedback and playtesting throughout the creative process. Taking advice and suggestions from my teacher at the AU, I made tweaks to certain clutter items, rubble placements and navmesh layouts. This enabled me to polish the level to a higher standard overall.
- External Playtesting
- I also enlisted some external playtesters to try out my level and gathered their feedback. This was invaluable and it was great to watch other people play through something I’d made!
- Although I’d completed the design and build, this feedback was invaluable for future design considerations. It also really helped me analyse how others had navigated and understood the spaces I’d created.
What This Project Taught Me
Designing and building Lokir’s Tomb was revelatory for me. It showed me that I was capable not only of writing and designing game narratives but that I could use that skill to help me develop narrative-rich environments. Crucially, I discovered a new interest in level design not only in terms of the technical aspects of putting a level together in an engine, but in the potential to create interactive environments that support, embed and deliver narrative elements to players in their own right.
It also taught me about understanding flow through a space and giving each area of the level purpose. In Lokir’s Tomb, this was on a very small scale, however, the process helped me envisage and understand how to design rooms and exploratory areas in ways that tell stories that feel authentic to the level’s needs and the player’s interest.
On the whole, the project showed me that I can develop levels that look and feel engaging. It’ll be interesting to see how I can build on this further, by designing my own levels beyond the tutorial. I also hope to use the skills and concepts I’ve learned from Lokir’s Tomb and see how they help me to design levels in a newer engine, such as Unity or Unreal, for example. That will be my next step, once I’ve practiced building areas in the Creation Kit a bit more.